Showing posts with label vintage sewing. Show all posts

Tuesday, August 14, 2012

Construction of 1912 Scalloped Edge Skirt

So this is my first of two posts about the construction of my first pattern from the 1912 Titanic Sew Project .


This is a pattern for a lovely scalloped edge skirt from 1912. The skirt description states that the "skirt is made of heavy gray silk or taffeta, and is trimmed with covered buttons in any fabric desired." I really liked the striped looked in the illustration, so I specifically sought out a striped fabric.

I ordered mine by mail, as to avoid the pesky taping of pieces together (I've done that before and was not a fan). I'd like to comment on the quality of the paper of this pattern, I don't believe I've used a pattern on this type of paper before, but I quite liked it.  I went straight into cutting out the pieces in the beautiful linen I picked up from JoAnn's..I spent several days scouring local fabric stores till I found something I really liked, and I happened upon this really nice striped linen. Linen is, of course, not taffeta or anywhere close, but I do always tend to go my own way.. If I were a patient person, I would have started with a muslin version, but I tend to skip that step a lot. I typically only do a muslin if I'm really unsure of the construction of something. I was delighted to find that this pattern came in my waist measurement as is, so there was no need to make any alterations to the pattern. So I happily cut into my fabric and started sewing right away.

I started with the scallop edge facing. I knew the scalloped edge would be the most difficult thing to tackle, so I started with it. I cut the scalloped edge facing from a nice, dark brown linen/cotton blend (I tend to sew with only natural fabrics, I just love them so).


Here I folded over the straight edge of the scalloped edge facing and ironed as per the instructions.


Here's a better picture of the facing as I'm preparing it.

And here you can see that I just sewed down the folded over edge to create a finished edge for the edging. 


So here I lined up the facing with the scalloped edge side of the skirt, and topstitched it down, with the facing on what will be the inside of the skirt. 


Here I used my bias tape maker tool that I found in the quilter's department to make my own bias tape for the edge around the scalloped edge/facing.


I just ironed it in half and then pinned it along the edge of scalloped piece.

I then very slowly and carefully topstitched the the binding on. This was painstaking, and time consuming, but I think it turned out pretty well.

Once I finished attaching the binding on the edge of the scallop front, I pieced the panels together. I left an opening on the scalloped edge side (left front), probably about 6 inches long, where I later attached hooks and eyes for closure.


Next I used covered buttons, which I covered with the same brown linen/cotton that I used to bind the edge of the scalloped front piece, to decorate each scalloped edge. This was my first time using covered buttons, and it didn't occur to me that the fabric was so thin that you might be able to see the metal through the buttons..it's not as noticeable on the skirt, so I decided to leave it as is, and consider it a lesson learned.


Here is a photo of the skirt about halfway through it's construction, I think it's turning out rather well, so far.

 I then attached the waist band to the body of the skirt. The directions recommended using canvas to reenforce the waist band, but I didn't have any on hand, so I used denim, which seemed to do the trick. I then hand stitched down the waist band to create an invisible finish from the front. I forgot to take a photo of this step!


I then finished the edges of each piece with a zig-zag stitch (one day I'll get a serger!)

Last but not least, I hemmed the skirt using an "invisible hem" stitch, because I absolutely deplore hand sewing and will avoid it if at all possible..
So this concludes the construction of my scalloped edge 1912 skirt for the Titanic Sew Along Project. I will be following up with a subsequent post with photos of the finished project very shortly!


Monday, July 16, 2012

A fantastic find!

I recently came across a fantastic Craislist find! I was able to purchase a 1916 (date is approximated based on serial number) White treadle sewing machine for $60.

Here is what it looks like in its case! It has some cosmetic damage from being stored in someones basement for years, but is in pretty good shape otherwise.

After taking a look at the underneath, which really means my Dad (the engineer) took a look underneath, we believe that it's in pretty good mechanical shape. It does need a belt replaced and some cleaning/oiling. Also, it did come with the apparently pretty hard to find shuttle and bobbin!

My love and I traveled out to the man's home a few days prior to picking it up to see it and talk to the man about it. I loved it so much, I took a chance and went ahead and gave him the cash so that there wouldn't be a chance someone else would snatch it up. I knew I was getting a good deal, but I really had no idea at that time what a good deal I was getting!

A few days later, my dad and I rode over in his van to pick it up, it's quite large and bulky of course. My dad looked it over and agreed that it was nice. He started pulling out the drawers, and low and behold! there was a little black box..


 My dad pulled it out and the guy whom I was purchasing it from stated that he had no idea that the box was in there..I opened it up to reveal a treasure trove!


So many attachments, and I have no idea what most of them are for, but I love them already! The man that I bought it from said that I sure got my $60 worth, and he was right!

I've recently moved and still have a million boxes to unpack, so it will be a little while until I can work on Thelma (yes, I named the machine :P). Hopefully I will be posting about her progress soon.

Also, a future post will include quite a few other fantastic finds that I purchased from the same gentleman. Sadly his wife recently passed away, and was a quilter, so she had a vast fabric stash that he let me look through and I found so many wonderful pieces, not to mention a ton of records and some vintage hair clips! I'll be doing a more in depth post with photos soon!

Thursday, May 31, 2012

New patterns en route!

I "accidentally" stumbled into the Past Patterns catalog a couple of days ago, and talked myself into ordering a few new patterns ;P. I ended up with three 1920s patterns, and already have the fabric picked out for one of them. They should be arriving in the middle of next week :). 


 This is #2307 "Ladies' and Misses One-piece dress with vest front: Circa 1923-24"
 This is #3110 "Ladies dress with Separate shirt waist: Circa 1922-23"
This is #9412 "Ladies' skirt with hip pocket effect: Circa 1920" I have some lovely brown wool in mind for this skirt. 

An actual finished project!

Here is an actual finished project for you to marvel at ;P. I actually finished this some months ago, but decided to share it with you anyway..
This is also a Past Patterns pattern, #8340, entitled "Ladies' House Dress: Circa 1921." I really do like Past Patterns, and I think it's mostly due to their enormous collection. This pattern came with nearly no instructions..it was a single sheet that, at some point, was torn in half, so that I only received half of the directions. This was noted in the catalog on the Past Patterns website, as it is for a lot of her Vintage Revival patterns. I have many more patterns that I plan to pick up from her in the near future.

This one was a bit difficult, partially due to it being my first pattern of this era, I'd only sewn Civil War garments up till this point, partially because the instructions were half gone..and also because I made a terrible fabric choice. I chose a very lightweight, gauzy cotton, which was a real pain to work with. I'm ambitious, what can I say?


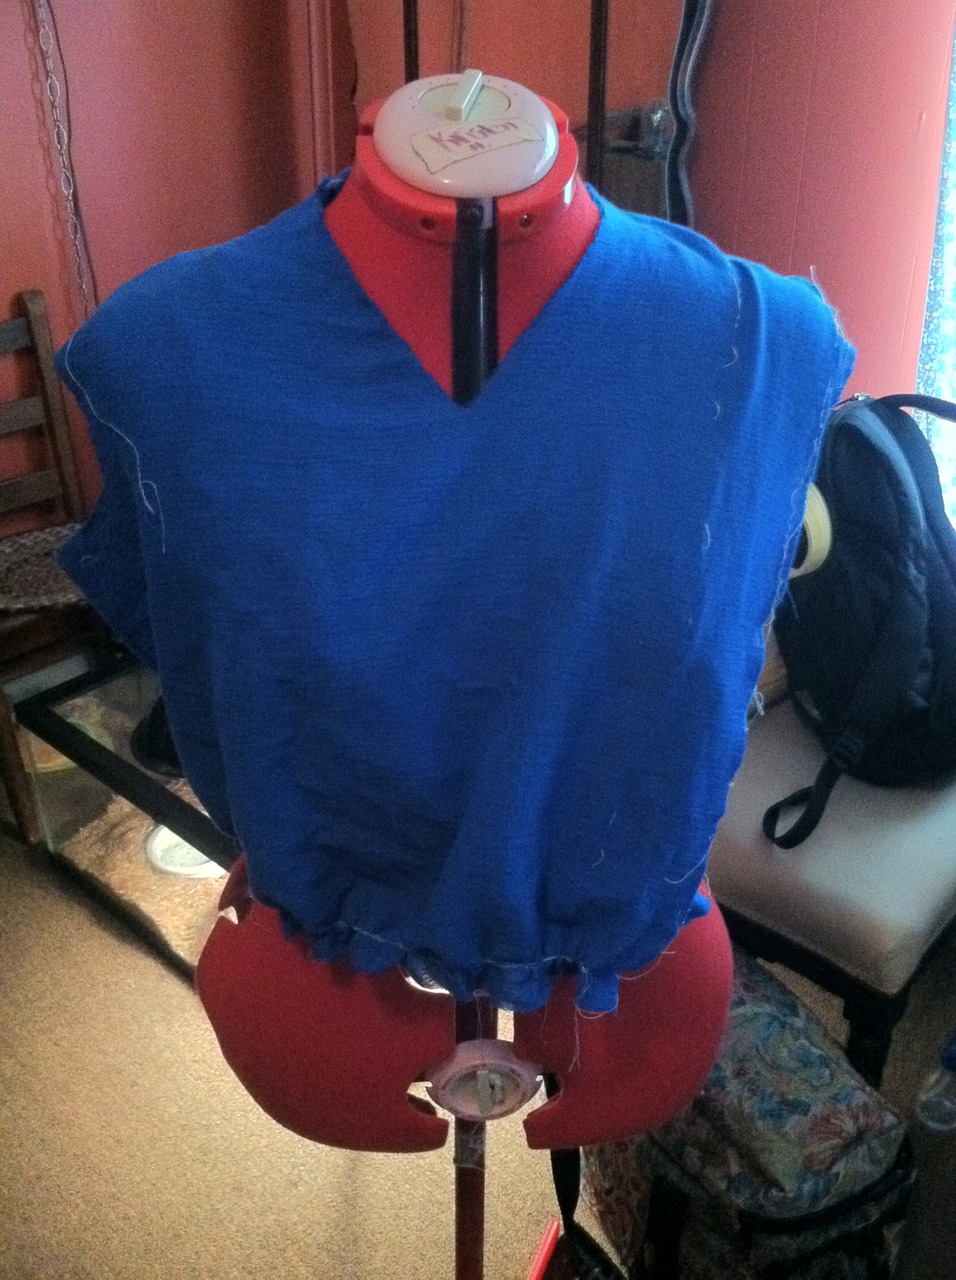
 The bodice is made up of 3 pieces: the back, and two front pieces that attach to the back at the side seams. I ran a gathering stitch along the bottom of all three pieces.  I laid the bodice out on the form, lining up the shoulder seams and neck opening (also making sure to lay the left side down first, as this dress closes on the right). I pinned down the back of the bodice to the form, and then pinned the side seams to the side of the form to hold it in place. I also pinned it down at the shoulders and around the neck to insure that it didn’t move around. I then pulled the gathers on each piece of the bodice individually to fit the waist of the form (which is always set to my measurements). I then promptly went to the sewing machine and sewed down the gathers so that I don’t have to worry about them loosening or tightening on their own. The next step will be to attach the skirt, which is also three pieces. I sadly did not get any photos of this stage of the process, but it went about the same as the bodice. I, of course, attached the three pieces to each other, and then lined up, pinned, and attached the skirt to the bodice. 
 
Here are a few photos of the finished project on my dress form. You can see that I opted for a white white eyelet fabric, which is also a gauzy cotton, for the collar, belt, and cuffs. I also used a set of pearl snaps for the closure. Were I to make this dress again, I would most likely go with buttons, as these snaps are really heavy for this light of fabric. The flower decoration I made myself from ribbon, using directions from a .pdf pattern I downloaded from eVINTAGE Patterns. I believe it was this pattern.
 
I should note that the waist for the pattern was originally 26 inches, so I had to alter it up to 34 inches. This was my first experience with significantly altering a pattern.


And here is a photo of me wearing the dress (I forgot the flower decoration). We took this while on a day trip to Birmingham to see the Vulcan statue. 


Tuesday, May 29, 2012

Preview of upcoming, soon to be finished projects!

I have been so terribly busy lately, as we are about to be moving..but! I wanted to give you a little sneak peak at a couple of projects that are nearly finished.
This is pattern #6611 from Past Patterns. It's entitled "Dress with Waist Yoke: Dated 1931." I actually started this dress in October of 2011, with the intent of wearing it at my brothers wedding in November, but as is my usual custom, I rushed it, and was not able to wear it to the wedding due to the arm holes being entirely too small..needless to say, I was pretty frustrated with myself, and so put the dress aside. I recently made a pact with myself to finish a few unfinished projects before I could start working on projects from the VPLL Titanic Sew Project, and so I have finished the dress. Photos, and a narrative of the construction will come soon, just as soon as I have the opportunity to do so.

This is pattern #7696 from Past Patterns, and is entitled "Ladies' One-piece bathing suit: Circa 1922. I began this project in January of this year, with the intent of wearing it while my sweetheart and I strolled along Tybee Island during our trip to Savannah in February, but sadly I was not able to complete it in time..I even took my sewing machine along with us! But it was not to be..so it too got set aside for a bit. However, I recently picked it back up again, and have only to attach a few buttons for it to be complete! I will be posting photos of it pretty soon (hopefully ;P).

Wednesday, May 16, 2012

A little shopping therapy

I've been feeling a bit under the weather lately, so I thought a little shopping at my favorite local antique store might do the trick, and it did :P. I came away with quite a nice collection of new (old) things, and am quite pleased.
I picked up these two patterns, for a grand total of $3! My first two Advance patterns, and also my first time finding patterns that I liked at an antique store. Typically I only find patterns from the 70s and 80s, which are not my favorite decades. The one on the left is a pattern from the 60s and the one on the right is a pattern from the late 40s.


I picked up these two fashion plates for $2.25, I thought they would be pretty framed and hung on the wall in my sewing room :).

I also picked up a ton of lace for $10. I haven't measured it yet, but it's quite a lot. I'm thinking of using some of it for a lace insert on a 1910's blouse pattern I bought from Wearing History.


I picked up 2 silk and 1 rayon scarf, for $5 a piece, and they are beauties. I plan to hand wash them soon to get the seemingly permanent folding lines out of them.


 I've been eyeing these 1920s shoe clips for a couple of years..I always manage to convince myself that I don't need them, but who doesn't need 1920s shoe clips? I got these for the swell price of $15.


And last, but not least, I got this adorable sterling silver brooch locket. I plan to remove the old photos (which I'll keep because I'd feel too guilty tossing them) and put in a photo of myself and my sweetheart :).

And so ends my adventure to the antique store for this week.

I have recently finished a few projects, so I'll be making some clothing posts soon!

Wednesday, May 9, 2012

New dress form

I got pretty lucky recently and acquired a new dress form at a pretty great price. Yay Craigslist! (my old one was a hand-me-down from my sister and didn't crank up to quite the right size)

It's a foam dress form that comes with a cover that allows you to stuff and add to measurements to fit your measurements exactly. Lucky for me, the dress form as-is is exactly my measurements. I got it for a swell price of $50..

I've already been putting this new toy to good use, and hopefully will be posting some newly finished projects soon. I have perhaps a dozen or so laying around unfinished..